Bare metal micro:bit has moved! Please update links and bookmarks.
X1000: Difference between revisions
No edit summary |
No edit summary |
||
| Line 3: | Line 3: | ||
{{FileTable|X1000| | {{FileTable|X1000| | ||
{{FileRow|@echo.c@|Main program}} | {{FileRow|@echo.c@|Main program}} | ||
{{ | {{FileHardware}} | ||
{{FileScripts|X1000}}}} | {{FileScripts|X1000}}}} | ||
Latest revision as of 10:40, 7 October 2024
Check you can build and upload a simple program.
Files
| x01-echo: | |
|---|---|
echo.c | Main program |
hardware.h | Header file with layout of I/O registers |
startup.c | Startup code |
device.ld | Linker script |
Makefile | Build script |
x01.geany | Geany project file |
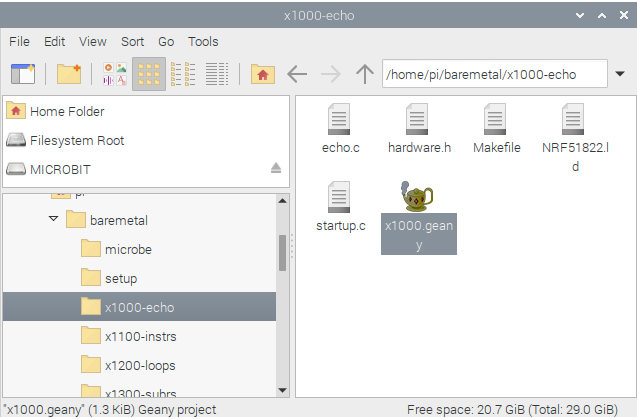
These files can be found in the directory x01-echo in the software kit. Two of them – echo.c and Makefile – are specific to this experiment, and the others – startup.c, hardware.h and device.ld – are used in multiple experiments.[1] Each directory also contains a Geany project file with a name like x01.geany. If you are using Geany and not your own choice of editor, then this is the file you can open (by double-clicking it in the file manager) to begin work on the project.
micro:bit version 2
On Version 2 of the micro:bit, the filedevice.ld is provided in a version that describes the memory layout of the enhanced microcontroller chip. The contents of hardware.h and startup.c are also different.Demonstration
You can get started with programming the micro:bit by building and running a simple program that lets you connect to the micro:bit over a serial interface, then echoes the characters that you type. Like all the programs we will work with, this one depends on no machine-specific library code, so all the details of how the machine is programmed are explicit. Remarkably for an embedded program, all the code is in a high-level language, and there is no assembly-language code. That this is possible is a nice feature of the Cortex--M0 or Cortex--M4 platform used on the micro:bit.
Building the program
Once you have obtained a copy of the project files (see Appendix B), use the file manager to navigate to the directory baremetal/x01-echo. You should see the same files as are listed above, including a file x01.geany with a magic lamp as its icon. Double-click on this icon to open the project in Geany.
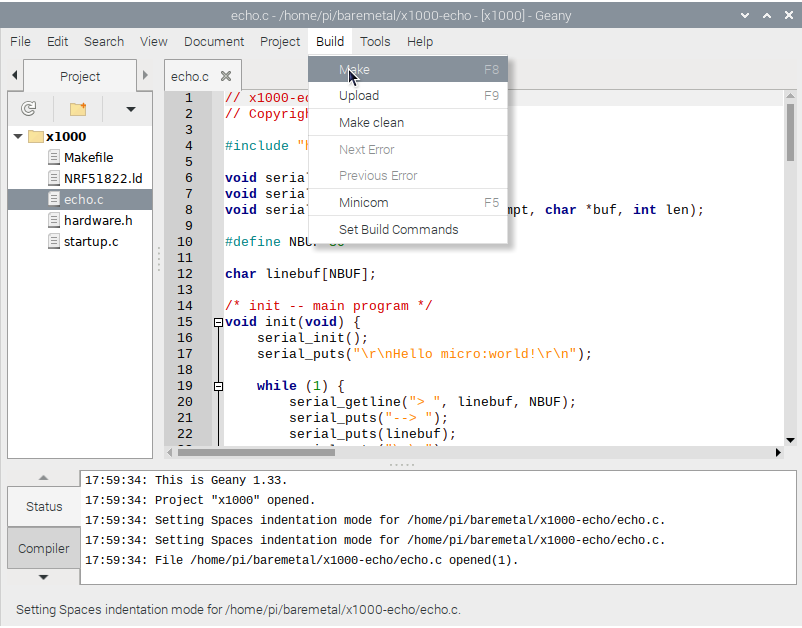
All being well, you should see the Project view in the left-hand sidebar, with the five files listed that make up the project. Double-click on the file echo.c to open it, if it is not open already.
Now choose Build>Make on the menu to compile the project. A number of commands will scroll past in the Compiler section at the bottom of the window. You can expand the window and move the divider if you like to see what they are. I'll just list them here without dissecting them, and explain further in the Background section later.
arm-none-eabi-gcc -mcpu=cortex-m0 -mthumb -O -g -Wall -c echo.c -o echo.o
arm-none-eabi-gcc -mcpu=cortex-m0 -mthumb -O -g -Wall -c startup.c -o startup.o
arm-none-eabi-ld -T device.ld echo.o startup.o -o echo.elf -Map echo.map
arm-none-eabi-size echo.elf
   text    data     bss     dec     hex filename
   1048       0      84    1132     46c echo.elf
arm-none-eabi-objcopy -O ihex echo.elf echo.hex
The final result is a file echo.hex that contains a binary program in a form ready to be uploaded to the micro:bit. The size program shows how much memory is occupied by the program; the numbers you see may be a little different, and I will explain later what each number actually means.
Running the program
If you plug in the micro:bit to the Raspberry Pi, it will appear on the desktop like a USB thumb drive named MICROBIT, and you can copy the file echo.hex to it by using the menu item Build>Upload within Geany.
Alternatively, you could use the file manager or a shell command to copy the file, as explained below.
All of these methods have the same effect: copying a hex file to the micro:bit causes the yellow LED to flash briefly. The MICROBIT drive icon will then disappear as a sign that the micro:bit is digesting the file you just uploaded, only to return a few seconds later.
If you now open the MICROBIT drive by double-clicking on it, you will see a couple of files. One of them, DETAILS.TXT, lists some information about your micro:bit, including its serial number. The other, MICROBIT.HTM, is a link to the micro:bit website. The file echo.hex that you uploaded has vanished, consumed as part of the process of programming the microcontroller on the board.
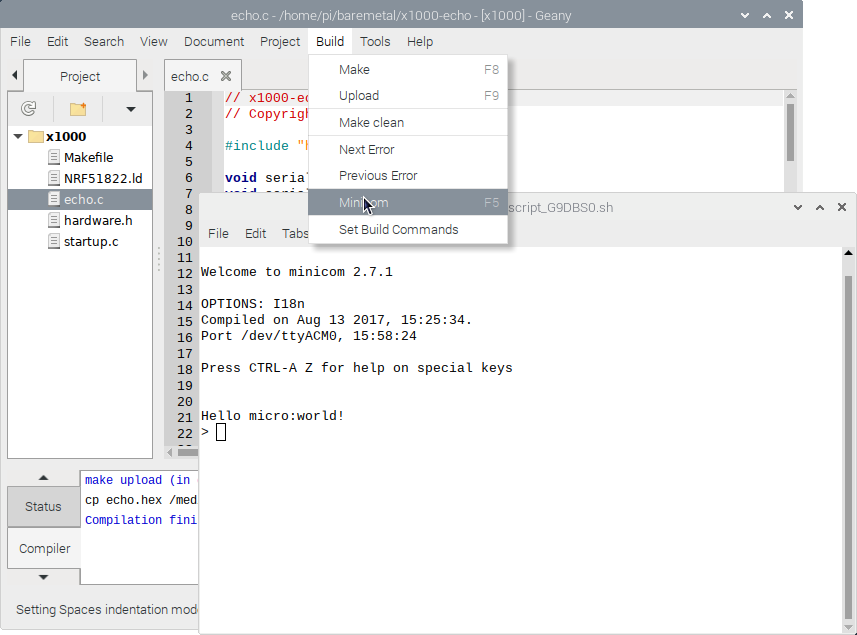
Once uploaded, the echo program reads and writes the serial interface of the micro:bit, which appears as a terminal device /dev/ttyACM0 on the Raspberry Pi. To connect with this device, it's convenient to use a program called minicom on the Pi. If you have the project open, you can start minicom by choosing the menu item Build>Minicom within Geany.
A command-line alternative is given below.
After connecting, you should press the reset button on the micro:bit (the one on the back, next to the USB port) to start the program from scratch. You should see the message Hello micro:world, followed by > as a prompt. Type characters at the prompt: they will be echoed, and you can use the backspace key to make corrections. When you press Return, the line you typed will be repeated, and then a new prompt appears.
Welcome to minicom 2.7.1
Port /dev/ttyACM0, 15:04:57
Press CTRL-A Z for help on special keys
Hello micro:world!
> Hello to you
--> Hello to you
>
If this works, then your micro:bit and the supporting software are working perfectly.
Command line alternatives
If you prefer not to use Geany, then there are alternative methods for uploading the program and connecting to it with minicom. To upload the program to the microbit, you can either visit the directory baremetal-v1/x01-echo or baremetal-v2/x01-echo in the file manager and drag the file echo.hex across to the MICROBIT drive icon on the desktop, or start a terminal window in the project directory and use the command
$ cp echo.hex /media/pi/MICROBIT
To connect with minicom, you can use the command
$ minicom -D /dev/ttyACM0 -b 9600
(or, if the defaults are set up suitably, just the command minicom on its own), then reset the micro:bit as before. All of these methods have the same effect.
Activity
The source file echo.c contains a lot of detail about how to use the serial interface between the micro:bit and the host computer: we will come to understand before too long what is going on. But for now, let's look near the start of the file at the main program, a function called init().
/* init -- main program */
void init(void)
{
    serial_init();
    serial_puts("\r\nHello micro:world!\r\n");

    while (1) {
        serial_getline("> ", linebuf, NBUF);
        serial_puts("--> ");
        serial_puts(linebuf);
        serial_puts("\r\n");
    }
}
The characters "\r\n" in the strings that are printed represent the carriage-return and line-feed that are needed to start a new line in the output.
As you can probably work out, after printing a welcome message, the program has a loop where it prints "> " as a prompt and waits for a line of input; then it prints "--> " and repeats the line of input, following it with a carriage return and line feed. Without too much difficulty, you should be able to modify the program so that it can conduct a conversation like this:
Hello micro:world!
What is your name? Mike
Hello, Mike!
What is your name? Jack
Hello, Jack!
It's just a matter of changing the string constants that appear in the program. When you have changed the program, you can choose the menu item Build>Make in Geany to compile it again, and Build>Upload to upload it to the micro:bit. You should see in the minicom window that the program has started again, and is now behaving in a way that reflects the changes you made.
Background
When we first compiled the program, several Linux commands were executed for us automatically, and when we asked to compiler the program again after changing it, some of those commands were run again to bring the binary form of the program up to date with the changes made to the source code. The Build>Make command in Geany (as we have it configured) invokes an external program called make to coordinate the task of compiling the program, and make itself learns what commands to run from a script called Makefile in the program directory.
The make program uses the timestamps associated with files by the computer's file system to decide which files need to be updated by re-running the commands that created them.
Initially, five commands were used to build the program. I will spell them out so that you know what they do, but after you have built a few programs, you will no doubt be content to let them whizz by without paying much attention – unless the build grinds to a halt with an error message, that is. The first command to be executed is this:
arm-none-eabi-gcc -O -g -mcpu=cortex-m0 -mthumb -Wall -c echo.c -o echo.o
This uses a C compiler, arm-none-eabi-gcc, to translate the source file echo.c into object code in the file echo.o. This compiler is a "cross compiler", running on the Raspberry Pi, but generating code for an embedded ARM chip: the none in its name indicates that the code will run with no underlying operating system. The flags given on the command line determine details of the translation process.
-O: optimise the object code a little.-g: include debugging information in the output.-mcpu=cortex-m0 -mthumb: generate code using the Thumb instruction set supported by the embedded ARM chip present on the micro:bit. (For the V2, the flag-mcpu=cortex-m0is replaced by-mcpu=cortex-m4, so that the compiler is permitted to use the extra instructions provided by the newer chip.)-Wall: warn about all dubious C constructs found in the program.
Next, make also compiles the file startup.c in a similar way.
arm-none-eabi-gcc -O -g -mcpu=cortex-m0 -mthumb -Wall -c startup.c -o startup.o
The code in startup.c is the very first code that runs when the micro:bit starts. It is written in C, but it uses several constructions that are specific to the micro:bit, and few of the usual assumptions about the behaviour of C programs apply.
With both of the source files translated into object code, it is now time to link the code together, forming a file echo.elf that contains the complete, binary form of the program. That is the purpose of the next command, which uses the linker arm-none-eabi-ld.
arm-none-eabi-ld -T device.ld echo.o startup.o -o echo.elf -Map echo.map
Again, the detailed behaviour of this command is determined by the long sequence of flags.
-T device.ld: use the linker script in the filedevice.ld. This script describes the layout of the on-chip memory of the micro:bit: 256K of flash ROM at address 0, and 16K of RAM at address 0x40000000. It also says how to lay out the various segments of the program: the executable code.textand string constants.rodatain flash ROM, and the initialised data.dataand uninitialised globals.bssin RAM.echo.o,startup.o: these are the files of binary code prepared earlier by compiling the C source.-o echo.elf: the output of the linker goes inecho.elf.-Map echo.map: a map of the layout of storage is written to the fileecho.map
Many of these flags can be used unchanged in building other programs, but it is good to know why they are there. In building this program, we have asked make to invoke the linker directly, but in later experiments we will start to use shorter commands that ask the C compiler to help with the linking step.
We are nearing the end of the process. The next command just prints out the size of the resulting program.
arm-none-eabi-size echo.elf
  text	   data	    bss	    dec	    hex	filename
  1064       0      84    1146     47c	echo.elf
Here we see that the program has 1064 bytes of code, no initialised storage for data, and 84 bytes of uninitialised "bss" space (actually, it is initialised to zero) for global variables. In the echo program, this consists almost entirely of an 80-byte buffer for a line of keyboard input. The V1 micro:bit has space for 256kB of code in its ROM, but only 16kB of RAM. For this program, that is plenty.
The final stage prepares the binary object code in another format, ready to be downloaded to the micro:bit board.
arm-none-eabi-objcopy -O ihex echo.elf echo.hex
The file echo.elf is a binary file, containing the object code and a lot of debugging information, whereas echo.hex is actually a text file, containing just the object code encoded as long hexadecimal strings. The programming process on the micro:bit can take this file and load it into the flash ROM ready to be run when the micro:bit starts up.
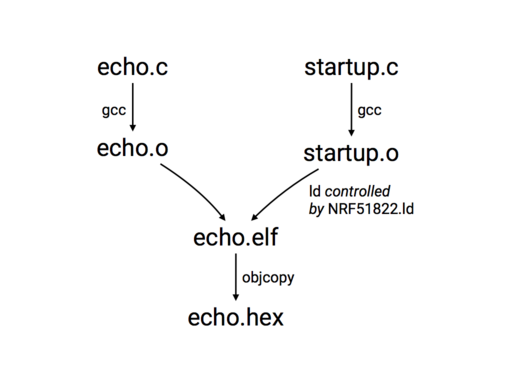
It's worth noting that, like all the programs in this book, the complete source code of the program is provided, and with very few exceptions, the program does not depend on any external libraries. This diagram summarises the steps needed to turn the source code into an executable binary program.
As the diagram shows, each of the files of C code, echo.c and startup.c, is translated by the compiler gcc into a corresponding file, echo.o or startup.o, of binary object code. These are then linked together by the linker ld into a single executable file echo.elf, and that is reformatted into the file echo.hex that gets uploaded to the micro:bit.
Context
On most machines, a C program starts with a function calledmain that receives, as an array of strings, the arguments that were specified on the command line when the program started. It can also assume an environment where there are standard input and output channels, typically connected to the keyboard and screen of a user. In embedded programming, things are different: there are no command-line arguments, and there is no way of communicating with a user unless we provide it ourselves. This difference in assumptions is partly reflected in the choice to call the main program init: it is the start of practically everything that happens in the machine including (as you see in the init function for the echo program) initialising the machine's I/O devices. The function init is actually called from code in startup.c that has done no more than ensure that the machine's memory is switched on and loaded with the data the program expects to find there.Challenges
In later experiments, there will be some more challenging exercises suggested here: right now, it is time to move on to Experiment 2, where we can start investigating the machine instructions that the micro:bit provides.
Questions
Why are the C compiler and other tools called by names like arm-none-eabi-gcc and arm-none-eabi-objdump?
These long names are chosen to distinguish these cross-compiling tools from native tools like gcc, which on a Linux PC is a compiler that translates C into code for an Intel processor. The lengthy names make explicit that the compiler generates ARM code (arm) for a machine running no operating system (none), and uses a standard set of subroutine calling conventions called the Extended Application Binary Interface (eabi). This explicitness is needed, because a Raspberry Pi might also have installed compilers for the Raspberry Pi itself (plain gcc) and maybe AVR microcontrollers (gcc-avr) and perhaps even the MIPS (mipsel-linux-gnu-gcc). As you can see, the naming conventions aren't quite consistent between GCC cross-compiler projects.
What does the module startup.c do?
That file contains the code that runs when the micro:bit first starts up. It sets up the hardware so that C code can run sensibly – for example, turning on the crystal-controlled processor clock, and putting global data where the program expects to find it – then calls the function init that is the main program of our application. The same file also contains other useful functions to support all our programs, including code that detects when there is a hardware fault (usually because the program is wrong) and handles the fault by flashing the "Seven Stars of Death", as we shall no doubt be seeing soon enough.
After uploading code to the micro:bit, a message appears in the top right-hand corner of the screen saying, "Drive was removed without ejecting." Is that important?
No: the Raspberry Pi tries to encourage you to 'eject' USB drives properly, rather than just pulling them out. The micro:bit appears to the Pi as a USB drive, and when it has accepted a hex file, it disconnects itself in order to digest the uploaded code. This appears to the Pi just like someone yanking out a USB drive, but no harm can possibly result.
How can I restore the original demo program to my micro:bit?
Download and flash the hex file you can find on the official 'out of box experience' page.
- ↑ The contents of these shared files are identical in each experiment, and generally speaking, two files in different experiments that have the same name also have identical contents. The build script
Makefileis the one exception to this rule, as it contains specific instructions for building the program in this experiment; other experiments have their ownMakefilespecific to them.


